OR
How to Make a Hogwarts Scarf By Learning From My Mistakes
These instructions are for the Knifty Knitter knitting looms, but in making them I relied heavily on information I found at Atypically.Knit.
Of course you could make a Hogwarts scarf in just about any style, just by sticking to the house colors, but Hogwarts scarves, as shown in the Harry Potter movies, come in two basic varieties: the first kind, from movies 1 & 2, and a second style, from movies 3 & 4. The first style is basically nineteen equal-sized stripes of each house's colors, with eleven bunches of fringe in alternating colors at each end. Colors are bright. (For more detail and a knitting pattern see here. ) In movies 3 & 4, the scarves are made with the darker house color, with seven (more or less) instances of two narrow, light-color stripes placed near each other (what is called a trapped bar design); the exception is Hufflepuff house, which has the same design but in dark-on-light. These scarves have a short, dark fringe, and the colors overall are darker and more subdued than in the first two movies. (For more detail and a knitting pattern see here. For a crochet pattern see here.)(The fourth movie also contains what seems to be a general Hogwarts scarf--narrow stripes of house colors on a dark, probably grey, field.)
If, like me, you're new to the Knifty Knitter, either of these scarves will give you a lot of practice changing color, not to mention knitting over. Plus you'll have a fun HP scarf at the end.
For either style scarf, you will need...
*Worsted weight yarn in the colors of your preferred house. (Gryffindor--scarlet & gold; Ravenclaw--blue & either silver (movie) or bronze (book); Hufflepuff--yellow & black; Slytherin--green & silver.)
*The Red, or Child-size, Knifty Knitter Loom. (The red loom is 7" wide and will make a scarf that is just over 5 inches wide. If you want a wider scarf you could go with the green, adult-size loom, which I'm guessing will make a scarf about 7" wide.)*Yarn needle, scissors, knitting pick.
Hogwarts Scarf, First Style
I made a Gryffindor scarf. I used Red Heart Super Saver acrylic yarn in Gold and Mainstays acrylic in Autumn Red; the Red Heart SS in Burgundy also would have looked good. This yarn is cheap and worked well for this project. You can work 1 over 1 with it, so you don't even use much of the yarn; I had about a third of each skein (they were 7 oz.) left over. Of course if you want a more refined look, you'll need fancier yarn.Directions:
1.) Begin with your darker house color. Leaving a short tail, anchor your yarn and e-wrap all the way around twice. Anchor the end. Knit over. E-wrap again, anchor, and knit over. Repeat until you've knitted ten rows. Anchor your yarn and cut it; you should have a tail three or four inches long left.2.) Now you're going to change to your other color. Leaving a tail 3-4 inches long, anchor your new yarn and e-wrap all the way around. Anchor and knit over. When you've knitted all the way around, take the tails of both yarns and tie them together. Now you can continue wrapping and knitting over as before. When you have knitted ten rows of the second color, stop, and change color again.
3.) Keep repeating steps 1 & 2 until your scarf is the desired length. End with a dark stripe. (Optional: because you'll be "losing" a bit of length on each end to the fringe, you may want to make the first and last stripe one row longer than the other stripes. It's a tiny, anal retentive sort of thing and makes little difference.)
4.) Cast off. (I usually use the second flat removal method at Decor accents, but you can also single crochet to get your piece off the loom.)
5.) Turn your tube inside out. Take your yarn needle and weave in all the tails you left when you changed colors. Turn tube right side out.
6.) Find where you changed color; there will be a small uneveness in the stripe there. Align the color change rows down one side of your scarf.
7.) Optional (this isn't strictly necessary, but I did it and think it helps): Lay your scarf out nice and straight on a towel. Mist very slightly with a water bottle. Lay another towel on top, cover with books, and leave over night. It will be nice and flat and the color change rows will stay in place while you add your fringe.
8.) To make the fringe, wrap your darker yarn around a hardcover book (I used the second HP book) and wrap around it about 84 times. Cut the wrapped yarn at one edge of the book. Now wrap your lighter yarn about 70 times and cut. Organize your cut pieces of yarn into bundles of 7 strands each; you should have 12 dark bundles and 10 light bundles. To make your fringe, take a bundle and fold it in half. Poke a large crochet hook through both sides of your knitted tube and pull your bundle half way through. Stick the cut ends of the bundle through the curved end and pull; if you've ever made a tassel on the end of a bookmark, this is the same thing. Atypically.knit recommends doing your middle tassel first, then one on each end, then filling in. Don't forget to alternate colors, beginning and ending with your dark color.
Learn from my mistakes:
The movie scarf is 19 stripes, but my scarf was starting to look kind of long, so I stopped on 15 stripes. This turned out to be a little too short for me (I'm 5'7"), so I should have made at least 17 stripes or gone for the full 19 as planned; fifteen stripes would probably work fine for a child.I made the full number of tassels on each end, but 11 is too many for a scarf made on the red loom and they are pretty jammed on; nine tassels would work much better. Eleven would probably work fine with a scarf made on the green loom, plus the width on that would made a scarf closer to the movie width anyway.
About the scarf width, the red loom made the scarf a little more narrow than I thought it would. I think the width is fine even for adults, and for a child, it's probably the best size; a teenager or adult wanting a more "movie-accurate" look might want to go with the green loom.
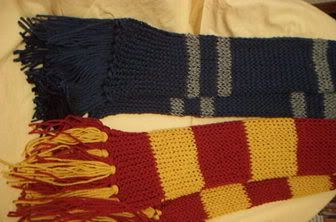
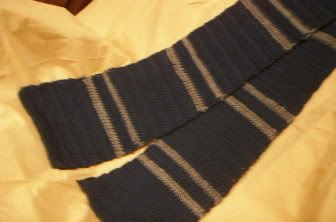
Hogwarts Scarf, Second Style
I made a Ravenclaw scarf of Caron Simply Soft yarn (see below) in Dark Country Blue and Gray Heather. This scarf takes very little of the second color.
Directions:
1.) Begin with your main color (the darker one, unless you're doing Hufflepuff). Leaving a short tail, anchor your yarn and e-wrap all the way around twice. (Depending on your yarn, you may need to wrap a third time; see below.) Anchor the end. Knit over. E-wrap again, anchor, and knit over. Repeat until you've knitted 16 rows. Anchor your yarn and cut it; you should have a tail three or four inches long left.2.) Now you're going to change to your accent color. Leaving a tail 3-4 inches long, anchor your new yarn and e-wrap all the way around. Anchor and knit over. When you've knitted all the way around, take the tails of both yarns and tie them together. E-wrap all the way around, anchor, and knit over. Cut your yarn, leaving a tail of 3-4 inches.
3.) Take your main color yarn, anchor it, and wrap all the way around. Anchor and knit over. Take the two tails and tie together. E-wrap again, anchor, and knit over. Repeat. Cut your yarn, leaving a tail.
4.) Take your accent color yarn and, leaving a tail, anchor it and e-wrap all around. Anchor and knit over. Take tails of yarn and tie together. E-wrap, anchor, and knit over. Cut your yarn, leaving a tail.
5.) Take your main color yarn, anchor it, and wrap all the way around. Anchor and knit over. Tie the two tails together. Continue wrapping and knitting over with your main color until you have 16 rows. Anchor your yarn and cut it, leaving a tail.
6.) Repeat steps #2-5 until your scarf is the desired length. (The movie scarves seem to have seven instances of the trapped bar design; I chose to stop mine after six.)
7.) Cast off.
8.) Turn your scarf inside out and use your yarn needle to weave in all the tails you left. Turn scarf right side out. Look for the row where you changed color, and make sure that row is aligned on one side all the way up. Optional: You can block the scarf as listed in step #7 of the first pattern above.
9.) To make the fringe, wrap your main color yarn around a book about 50 times. Cut the wrapped yarn along one edge of the book. Divide your yarn into little bundles of five strands each. Take a bundle and fold it in half. Poke a large crochet hook through both sides of your knitted tube and pull your bundle half way through. Stick the cut ends of the bundle through the curved end and pull. Atypically.knit recommends doing your middle tassel first, then one on each end, then filling in. When you have tassels across each end, you can trim to make a short, even fringe. (I decided I preferred mine long, but I don't think that's movie-accurate.)
Learn from my mistakes:
The Caron Simply Soft yarn does not work well on the Knifty Knitter. Its softer texture (usually a good thing) and lighter weight produces a loose-looking knit that is easily snagged. Experimenting since then, I've found that knitting 1-over-2 (wrap one extra time before knitting over) instead of 1-over-1 would fix most of the problem with the Simply Soft yarn. I recommend just using another yarn.I made my light color stripes and the dark bar between the stripes one row longer than I had intended to, and it is too wide. They don't look right. (I've given the "correct" way in the directions.)
I didn't use good sense. I saw shortly after I started that the Simply Soft yarn wasn't working. I should have pulled it apart and tried 1-over-2 then or went and got a different kind of yarn, but I didn't listen to that little voice playing spokesman for my better judgement. I made the stripes a row wider than I had intended to do because, while making the first one, I had an attack of doubt and changed my plan; but by the time I'd made a couple of the stripes I could see they were too wide--my original plan had been right after all--but instead of pulling those out and starting over, I just kept on with what I was doing. Like I said, there was a lack of good sense.
Like with the first style scarf, if you want a scarf that looks as wide as in the movies, you may want to try moving up to the green loom.
A mistake I made with both scarves was to spread them out on the back of my couch to look at, and then went away and left them for a while. When I came back, our cat had walked all over them and was now happily napping on them. I don't recommend letting your cat walk on your scarves; whether you let it nap on them or not depends on how you feel about cat hair, your cat's comfort, and, I suppose, the scarves themselves.
Oh, and a further note on my Hogwarts scarf-making experience: As I had plenty of the Simply Soft yarn left and as that blue color is really nice, especially with Uncle Pookie's coloring, I decided I was getting a scarf out of it. I crocheted a second Ravenclaw scarf, a la Luvtocraft. (It's all double crochet, so it's easy.) To my crochet-novice eyes, it looks great, and I've already insisted Uncle Pookie wear it out. In our warm climate, scarves are mostly decorative and men rarely wear them, but Uncle Pookie is confident in his masculinity (or is that his feminine side?) and, as I pointed out, if anyone bandies about the word fruity when they see his scarf, we can remind them that John Wayne often wore fancy neckerchiefs in his movies and no one said a thing. (He wore bracelets too.) The Simply Soft, incidentally, crochets very nicely.
If anyone uses these instructions, or is inspired by them to come up with a better Knifty Knitter Hogwarts pattern, I'd love to hear about it.

3 comments:
Have you learned how to knit on the knifty knitter straight looms and if so 1. have you "knitted" a scarf, and 2. please be so kind to provide instructions. Thanks much!!
I have made both styles and I strongly recommend using a sport weight yarn, not worsted. It is a little more work but worth it. I used Brown Sheep Nature Spun sport weight yarn from Patternworks.
How many pegs on your red loom?
Post a Comment